How to make store bought pizza dough way better.
Store-bought pizza dough is convenient — but it doesn’t always behave the way you want. It tears. It springs back. It bakes up dense instead of light and airy.
The good news? With a few pro tweaks, you can turn that grocery-store dough into something that tastes homemade.
In this guide, I’ll walk you through how to improve store-bought pizza dough step-by-step — from dough selection to stretching to baking on the right surface. Let’s turn it into something amazing.
🔍 Step 1: Start with Quality Dough (Look at the Ingredients)
Not all store-bought pizza dough is created equal. If you want it to behave more like homemade dough, start by flipping the package over.
Look for:
-
Organic or unbleached flour
-
Filtered water
-
Sea salt or kosher salt
-
Yeast
-
Olive oil (optional)
Avoid doughs with preservatives, dough conditioners, or a long list of unrecognizable ingredients. The simpler, the better.
Pro tip: The dough sold at Whole Foods or your local pizzeria often has a shorter ingredient list and better fermentation potential than the stuff in a pop-can tube.
🍕 Step 2: Why You Should Divide and Re-Ball It
Most store-bought dough comes in 1-pound bags. If you use it straight out of the bag, you're missing a key step that gives your crust structure, stretch, and oven spring.
Here’s what to do:
-
Divide that 1-pound dough ball into two equal portions.
-
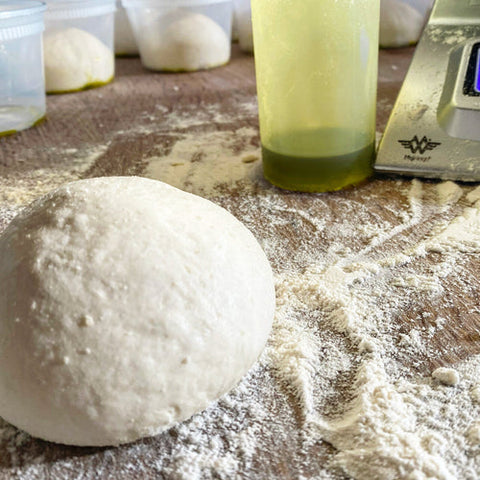
Re-ball each piece by folding the dough into itself a few times, rotating as you go.
-
Create surface tension by tucking and smoothing the outer layer—like pulling a jacket tight around a pillow.
This re-balling step realigns the gluten strands and helps trap gas as the dough rests. You’re building strength and stretchability.
Skip this step, and your dough may feel weak, tear easily, or snap back like a rubber band.
🔥 Step 3: Let the Dough Rest Like a Pro
After you’ve re-balled the dough, it needs time to relax.
Literally.
Let it sit at room temperature (68–72°F) for 3 to 4 hours.
Here’s what happens during that rest:
-
The gluten softens and becomes easier to stretch.
-
Gas builds up inside, making the crust lighter and more open.
-
The dough loses its tight, elastic snapback and becomes silky and workable.
Pro tip: Place each dough ball in a lightly oiled container or on a tray under plastic wrap to prevent drying out.
This step transforms stiff, uncooperative dough into something that feels alive in your hands. Soft. Stretchy. Dreamy.
Step 4: Bake It on the Right Surface
All that prep leads to one moment: the bake.
To get the crispy bottom and bubbly top of a true pizzeria pie, your home oven needs help. The trick? Bake on something that holds and transfers serious heat.
Enter: the Baking Steel.
Steel conducts heat better than stone — about 18× better. That means:
Instant oven spring when the dough hits the surface
Crisp, golden crust with charred bubbles
Cook time under 5 minutes (depending on temp and broiler use)
How to do it:
Place your Baking Steel on the top rack
Preheat at 500°F (or as high as your oven goes) for 45–60 minutes
Launch your pizza directly onto the hot steel using a peel
Bonus: If your oven has a broiler, flip it on right before launch to mimic the top-down heat of a real pizza oven.
Step 5: What Happens If You Skip These Steps?
Let’s talk about what doesn’t work.
If you skip the re-balling and resting steps, here’s what usually happens:
The dough resists stretching
It tears easily or forms weak, thin spots
It shrinks back after every stretch (like a rubber band)
It bakes up dense, chewy, and flat instead of airy and crisp
Why? Because the gluten never had a chance to relax and reorganize.
It’s like trying to stretch cold, tight muscles — it fights back.And if you bake it on a cool or underpowered surface like a sheet pan, you'll likely end up with a pale, soft bottom instead of that crisp, golden crunch.
You don’t need to be a pro — just follow these steps and let the dough do the work.
Step 6: Bonus Tips for Even Better Results
These small details make a big difference when working with store-bought dough:
🔥 Don’t skip the flour
Lightly flour your hands and work surface before shaping. It keeps the dough from sticking and helps you shape with more control.
🍕 Use your fingertips, not a rolling pin
Flatten the dough gently with your fingertips and work from the center out.
Avoid pressing out all the gas — that’s what gives you bubbles and lift.🧊 Freeze extra dough the right way
Only using one ball today? Store the other in an airtight container or zip bag and freeze it. Here’s how to freeze pizza dough the right way.
🔄 Use this dough for more than pizza
Stretch it into breadsticks, flatbreads, or even garlic knots. Once it’s rested, the dough is incredibly versatile
Little adjustments = big results. Don’t just use store-bought dough — transform it.
Frequently Asked Questions
Can I use store-bought dough straight from the fridge?
Not recommended. Cold dough is tight and tears easily. Let it rest at room temperature for at least 3–4 hours after re-balling.
Why does my dough keep snapping back when I stretch it?
The gluten is too tight. That’s usually a sign the dough hasn’t rested long enough or wasn’t re-balled to create surface tension.
What’s the best surface to bake pizza on at home?
A Baking Steel. It holds heat better than stone or pans, giving you a crispy, golden crust in just minutes.
Can I freeze store-bought dough?
Yes! If you’re not using all of it, pop it in an airtight container or bag and freeze it. Here’s how to freeze dough the right way.
🧪 The Visual Test
Does your supermarket dough stretch like this?
Does it bubble like this?
If not, you’re skipping the most important part: the re-ball + restBonus Tip:
If you’re short on time, keep a few balls in your fridge for the weekend. Or try your local market’s dough — just check that ingredient list and give it some room temp love before baking.
🧠 TL;DR:
Choose dough with clean ingredients
Split it → re-ball it → rest it
Bake hot on a Baking Steel
Store-bought doesn’t mean second-rate — if you treat it right